2.2. Containerized Land DA Workflow
These instructions will help users build and run a basic case for the Unified Forecast System (UFS) Land Data Assimilation (DA) System using a Singularity/Apptainer container. The Land DA container packages together the Land DA System with its dependencies (e.g., spack-stack, JEDI) and provides a uniform environment in which to build and run the Land DA System. Normally, the details of building and running Earth system models will vary based on the computing platform because there are many possible combinations of operating systems, compilers, MPIs, and package versions available. Installation via Singularity/Apptainer container reduces this variability and allows for a smoother experience building and running Land DA. This approach is recommended for users not running Land DA on a supported Level 1 system (e.g., Hera, Orion).
This chapter provides instructions for building and running the Unified Forecast System (UFS) Land DA System CADRE sample cases using a container.
Attention
This chapter of the User’s Guide should only be used for container builds. For non-container builds, see Chapter 2.1, which describes the steps for building and running Land DA on a Level 1 System without a container.
2.2.1. Prerequisites
The containerized version of Land DA requires:
Installation of Apptainer (or its predecessor, Singularity)
At least 26 CPU cores (may be possible to run with 13, but this has not been tested)
The Slurm job scheduler
Apptainer is preinstalled for users at the CADRE DA training; users do not need to install it unless they are attempting to build and run the containerized Land DA System on a different platform.
2.2.2. Data
Attention
Data is pre-staged for the CADRE DA training, and users at the training may skip this section.
In order to run the Land DA System, users will need input data in the form of fix files, model forcing files, restart files, and observations for data assimilation.
Data for the CADRE DA training are already available on the system used for the training. When attempting to replicate the steps on another system, users will need input data in the form of fix files, model forcing files, restart files, and observations for data assimilation. These files can be downloaded from the Land DA Data Bucket into the user’s directory of choice. In the working directory, run:
wget https://noaa-ufs-land-da-pds.s3.amazonaws.com/CADRE-2025/Land-DA_v2.1_inputs.tar.gz
tar xvfz Land-DA_v2.1_inputs.tar.gz
2.2.3. Download the Container
Attention
The container is pre-staged for the CADRE DA training, so users at the training may skip this section.
Users will first need to download the container if it is not already on their system. The container for the CADRE DA training is already available on the system used for the training. When trying to replicate the steps on another system, users will need to download it from the Land DA Data Bucket into the user’s directory of choice. In the chosen directory, run:
wget https://noaa-ufs-land-da-pds.s3.amazonaws.com/CADRE-2025/ubuntu22.04-intel-landda-cadre25.img
This will download a container image named ubuntu22.04-intel-landda-cadre25.img.
2.2.4. Set Up the Container
Create experiment variables that point to the location of the data (${LANDDA_INPUTS}) and the container image (${img}):
export LANDDA_INPUTS=/home/ubuntu/inputs
export img=/home/ubuntu/ubuntu22.04-intel-landda-cadre25.img
From your working directory, copy the setup_container.sh script out of the container.
singularity exec -H $PWD $img cp -r /opt/land-DA_workflow/setup_container.sh .
The setup_container.sh script should now appear in your working directory.
Run the setup_container.sh script with the proper arguments.
./setup_container.sh -c=intelmpi/2021.13 -m=intelmpi/2021.13 -i=$img
where:
-cis the compiler on the user’s local machine (e.g.,intelmpi/2021.13)
-mis the MPI on the user’s local machine (e.g.,intelmpi/2021.13)
-iis the full path to the container image ( e.g.,/home/ubuntu/ubuntu22.04-intel-landda-cadre25.img).
Running this script will print the following messages to the console:
Copying out land-DA_workflow from container
Checking if LANDDA_INPUTS variable exists and linking to land-DA_workflow
Land DA data exists, creating links
Updating scripts files
Updating singularity modulefiles
Updating run related scripts
Setup conda
Getting the jedi test data from container
Update experiment variables
Creating links for exe
Done
The user should now see the land-DA_workflow and jedi-bundle directories in their working directory.
Containers come with pre-built executables, so users may continue to the next section to configure the experiment. However, users who are interested in learning how to build the executables can skip to Section 2.2.7.1 to learn how to build their own executables to use in their experiment.
2.2.5. Configure the Experiment
To configure an experiment, first load the workflow modulefiles for the container:
cd land-DA_workflow
module use modulefiles
module load wflow_singularity
Then navigate to the parm directory and copy the desired case into config.yaml:
cd parm
cp config_samples/samples_cadre/<cadre#_case_name>.yaml config.yaml
where <cadre#_case_name>.yaml is the name of one of the sample case files in the samples_cadre directory.
For example, when running the cadre1 case, run:
cd parm
cp config_samples/samples_cadre/cadre1_config.LND.era5.3dvar.ims.warmstart.yaml config.yaml
Modify variables in config.yaml as needed. For example, in cadre1, the Gulf Coast Blizzard hit the Gulf Coast late on January 20, 2025 and left land by January 23, 2025. To reduce the duration of the default forecast and save computational resources, users can change DATE_LAST_CYCLE to from January 25 to January 22 (2025012200):
ACCOUNT: epic
APP: LND
ATMOS_FORC: era5
COLDSTART: 'NO'
COUPLER_CALENDAR: 2
DATE_CYCLE_FREQ_HR: 24
DATE_FIRST_CYCLE: 2025011900
DATE_LAST_CYCLE: 2025012200
...
Users may configure other elements of an experiment in config.yaml if desired. For example, users may wish to choose a different EXP_CASE_NAME``or DA algorithm (via the ``JEDI_ALGORITHM variable). Users who wish to run a more complex experiment may change the values in config.yaml using information from Section 3.1: Workflow Configuration Parameters.
Generate the experiment directory by running:
./setup_wflow_env.py -p=singularity
If the command runs without issue, this script will print override messages, experiment details, and “0 errors found” messages to the console, similar to the following excerpts:
ubuntu@ip-10-29-93-226:~/land-DA_workflow/parm$ ./setup_wflow_env.py -p=singularity
 Python Log Level= str: INFO, attr: 20
INFO::/home/ubuntu/land-DA_workflow/parm/./setup_wflow_env.py::L34:: Current directory (PARMdir): /home/ubuntu/land-DA_workflow/parm
INFO::/home/ubuntu/land-DA_workflow/parm/./setup_wflow_env.py::L36:: Home directory (HOMEdir): /home/ubuntu/land-DA_workflow
INFO::/home/ubuntu/land-DA_workflow/parm/./setup_wflow_env.py::L38:: Experimental base directory (exp_basedir): /home/ubuntu
INFO::/home/ubuntu/land-DA_workflow/parm/./setup_wflow_env.py::L168:: Experimental case directory /home/ubuntu/exp_case/cadre1_lnd_era5_ims has been created.
INFO::/home/ubuntu/land-DA_workflow/parm/./setup_wflow_env.py::L175:: Rocoto YAML template: /home/ubuntu/land-DA_workflow/parm/templates/template.land_analysis.yaml
**************************************************
Overriding              ACCOUNT = epic
Overriding                  APP = LND
Overriding           ATMOS_FORC = era5
...
Overriding        queue_default = batch
Overriding               res_p1 = 97
**************************************************
           model_ver: v2.1.0
                 IMO: 384
           FRAC_GRID: NO
      NPROCS_FCST_IC: 36
           OUTPUT_FH: 1 -1
    DATE_FIRST_CYCLE: 2025012000
...
       LND_CALC_SNET: .true.
             ACCOUNT: epic
            KEEPDATA: YES
INFO::/home/ubuntu/land-DA_workflow/sorc/conda/envs/land_da/lib/python3.12/site-packages/uwtools/config/validator.py::L76::0 schema-validation errors found in Rocoto config
INFO::/home/ubuntu/land-DA_workflow/sorc/conda/envs/land_da/lib/python3.12/site-packages/uwtools/rocoto.py::L66::0 Rocoto XML validation errors found
2.2.5.1. ATML Configurations Only
For ATML configurations only (e.g., cadre3), users must modify the run_container_executable.sh script using a code editor of their choice. For example:
vim run_container_executable.sh
Uncomment the second-to-last line of the script, which adds the executables to the container by exporting the SINGULARITYENV_PREPEND_PATH variable:
# Uncomment the line below when running the ATML experiment
export SINGULARITYENV_PREPEND_PATH=/home/ubuntu/land-DA_workflow/sorc/build/bin:$SINGULARITYENV_PREPEND_PATH
${SINGULARITYBIN} exec -B $BINDDIR:$BINDDIR -B $CONTAINERBASE:$CONTAINERBASE $INPUTBIND $img $cmd $arg
Hint
When using vim, hit the i key to enter insert mode and make any changes required. To close and save, hit the esc key and type :wq to write the changes to the file and exit/quit the file. Users may opt to use their preferred code editor instead.
2.2.6. Run the Experiment
To run the experiment, users may submit tasks manually via rocotorun or use a script to automate submission.
2.2.6.1. Workflow Overview
Each Land DA experiment includes multiple tasks that must be run in order to satisfy the dependencies of later tasks. These tasks are housed in the J-job scripts contained in the jobs directory.
J-job Task |
Description |
Application/Configuration |
|---|---|---|
PREP_DATA |
Prepares the observation / DATM forcing data files |
LND/ATML |
FCST_IC |
Generates initial conditions (IC) files for the ATML configuration only |
ATML |
JCB |
Generates JEDI configuration YAML file |
LND/ATML |
PRE_ANAL |
Transfers the snow depth data from the restart files to the surface data files |
LND |
ANALYSIS |
Runs JEDI and adds the increment to the surface data files |
LND/ATML |
POST_ANAL |
Transfers the JEDI snow depth result from the surface data files to the restart files |
LND/ATML |
FORECAST |
Runs the forecast model |
LND/ATML |
PLOT_STATS |
Plots the results of the ANALYSIS and FORECAST tasks |
LND/ATML |
2.2.6.2. Automated Run
To submit jobs automatically, users should navigate to the experiment directory, download the run_expt.sh script, modify permissions, and run the script:
cd /home/ubuntu/exp_case/<EXP_CASE_NAME>
wget https://raw.githubusercontent.com/NOAA-EPIC/CADRE-DA-training/refs/heads/main/Day2/run_expt.sh .
chmod 755 run_expt.sh
./run_expt.sh
where <EXP_CASE_NAME> is replaced with the actual name of the experiment directory (e.g., cadre1_lnd_era5_ims).
To check the status of the experiment, see Section 2.1.5.4 on tracking experiment progress.
2.2.6.3. Manual Submission
To run the experiment manually, navigate to the experiment directory and issue a rocotorun command. For example:
cd ../../exp_case/cadre1_lnd_era5_ims
rocotorun -w land_analysis.xml -d land_analysis.db
Users will need to issue the rocotorun command multiple times. The tasks must be run in order, and rocotorun initiates the next task once its dependencies have completed successfully.
See the Workflow Overview section to learn more about the steps in the workflow process.
2.2.6.4. Track Progress
To check on the job status, users on a system with a Slurm job scheduler may run:
squeue -u $USER
To view the experiment status, run:
rocotostat -w land_analysis.xml -d land_analysis.db
If rocotorun was successful, the rocotostat command will print a status report to the console. For example:
       CYCLE         TASK                        JOBID        STATE  EXIT STATUS   TRIES   DURATION
===================================================================================================
202501190000          jcb                            1    SUCCEEDED            0       1       16.0
202501190000    prep_data                            2    SUCCEEDED            0       1       42.0
202501190000     pre_anal                            3    SUCCEEDED            0       1       17.0
202501190000     analysis                            7    SUCCEEDED            0       1       80.0
202501190000    post_anal                            8    SUCCEEDED            0       1        4.0
202501190000     forecast   druby://10.29.93.209:38153   SUBMITTING            -       0          0
202501190000   plot_stats                            -            -            -       -          -
===================================================================================================
202501200000          jcb                            4    SUCCEEDED            0       1       16.0
202501200000    prep_data                            -            -            -       -          -
202501200000     pre_anal                            -            -            -       -          -
202501200000     analysis                            -            -            -       -          -
202501200000    post_anal                            -            -            -       -          -
202501200000     forecast                            -            -            -       -          -
202501200000   plot_stats                            -            -            -       -          -
===================================================================================================
202501210000          jcb                            5    SUCCEEDED            0       1       16.0
202501210000    prep_data                            -            -            -       -          -
202501210000     pre_anal                            -            -            -       -          -
202501210000     analysis                            -            -            -       -          -
202501210000    post_anal                            -            -            -       -          -
202501210000     forecast                            -            -            -       -          -
202501210000   plot_stats                            -            -            -       -          -
===================================================================================================
202501220000          jcb                            6    SUCCEEDED            0       1       16.0
202501220000    prep_data                            -            -            -       -          -
202501220000     pre_anal                            -            -            -       -          -
202501220000     analysis                            -            -            -       -          -
202501220000    post_anal                            -            -            -       -          -
202501220000     forecast                            -            -            -       -          -
202501220000   plot_stats                            -            -            -       -          -
Note that the status table printed by rocotostat only updates after each rocotorun command (whether issued manually or automatically). For each task, a log file is generated. These files are stored in /home/ubuntu/ptmp/test_*/com/output/logs.
The experiment has successfully completed when all tasks say SUCCEEDED under STATE. Other potential statuses are: QUEUED, SUBMITTING, RUNNING, DEAD, and UNAVAILABLE. Users may view the log files to determine why a task may have failed.
2.2.6.5. Check Experiment Output
As the experiment progresses, it will generate a number of directories to hold intermediate and output files. The structure of those files and directories appears below:
$LANDDAROOT (<exp_basedir>): Base directory
 ├── land-DA_workflow (<HOMElandda>): Home directory of the land DA workflow
 │     ├── jobs
 │     ├── modulefiles
 │     ├── parm
 │     ├── scripts
 │     ├── sorc
 │     └── ush
 ├── exp_case
 │     └── $EXP_CASE_NAME
 │           ├── com_dir --> symlinked to ptmp/test_*/com/landda/v2.1.0
 │           ├── land_analysis.yaml
 │           ├── land_analysis.xml
 │           ├── launch_rocoto_wflow.sh
 │           ├── log_dir --> symlinked to ptmp/test_*/com/output/logs
 │           └── tmp_dir --> symlinked to ptmp/test_*/com/tmp
 └── ptmp (<PTMP>)
       └── test_* (<envir>)
             └── com (<COMROOT>)
             │     ├── landda (<NET>)
             │     │     └── vX.Y.Z (<model_ver>)
             │     │           └── landda.YYYYMMDD (<RUN>.<PDY>): Directory containing the output files
             │     │                 ├── datm
             │     │                 ├── hofx
             │     │                 ├── obs
             │     │                 └── plot
             │     └── output
             │           └── logs (<LOGDIR>): Directory containing the log files for the Rocoto workflow
             └── tmp (<DATAROOT>)
                  ├── [task_name].${PDY}${cyc}.<jobid> (<DATA>): Working directory for a specific task and cycle
                  └── DATA_SHARE
                        ├── INPUT_DATM
                        ├── hofx: Directory containing the soft links to the results of the analysis task for plotting
                        ├── hofx_omb
                        └── RESTART: Directory containing the soft links to the restart files for the next cycles
Each variable in parentheses and angle brackets (e.g., (<VAR>)) is the name for the directory defined in the file land_analysis.yaml (derived from template.land_analysis.yaml or config.yaml) or in the NCO Implementation Standards. For example, the <envir> variable is set to “test” (i.e., envir: "test") in template.land_analysis.yaml. In the future, this directory structure will be further modified to meet the NCO Implementation Standards.
Check for the output files for each cycle in the experiment directory:
ls -l $LANDDAROOT/ptmp/test_*/com/landda/<model_ver>/landda.YYYYMMDD
where YYYYMMDD is the cycle date, and <model_ver> is the model version (currently v2.1.0 in the develop branch). The experiment should generate several restart files.
2.2.6.5.1. Plotting Results
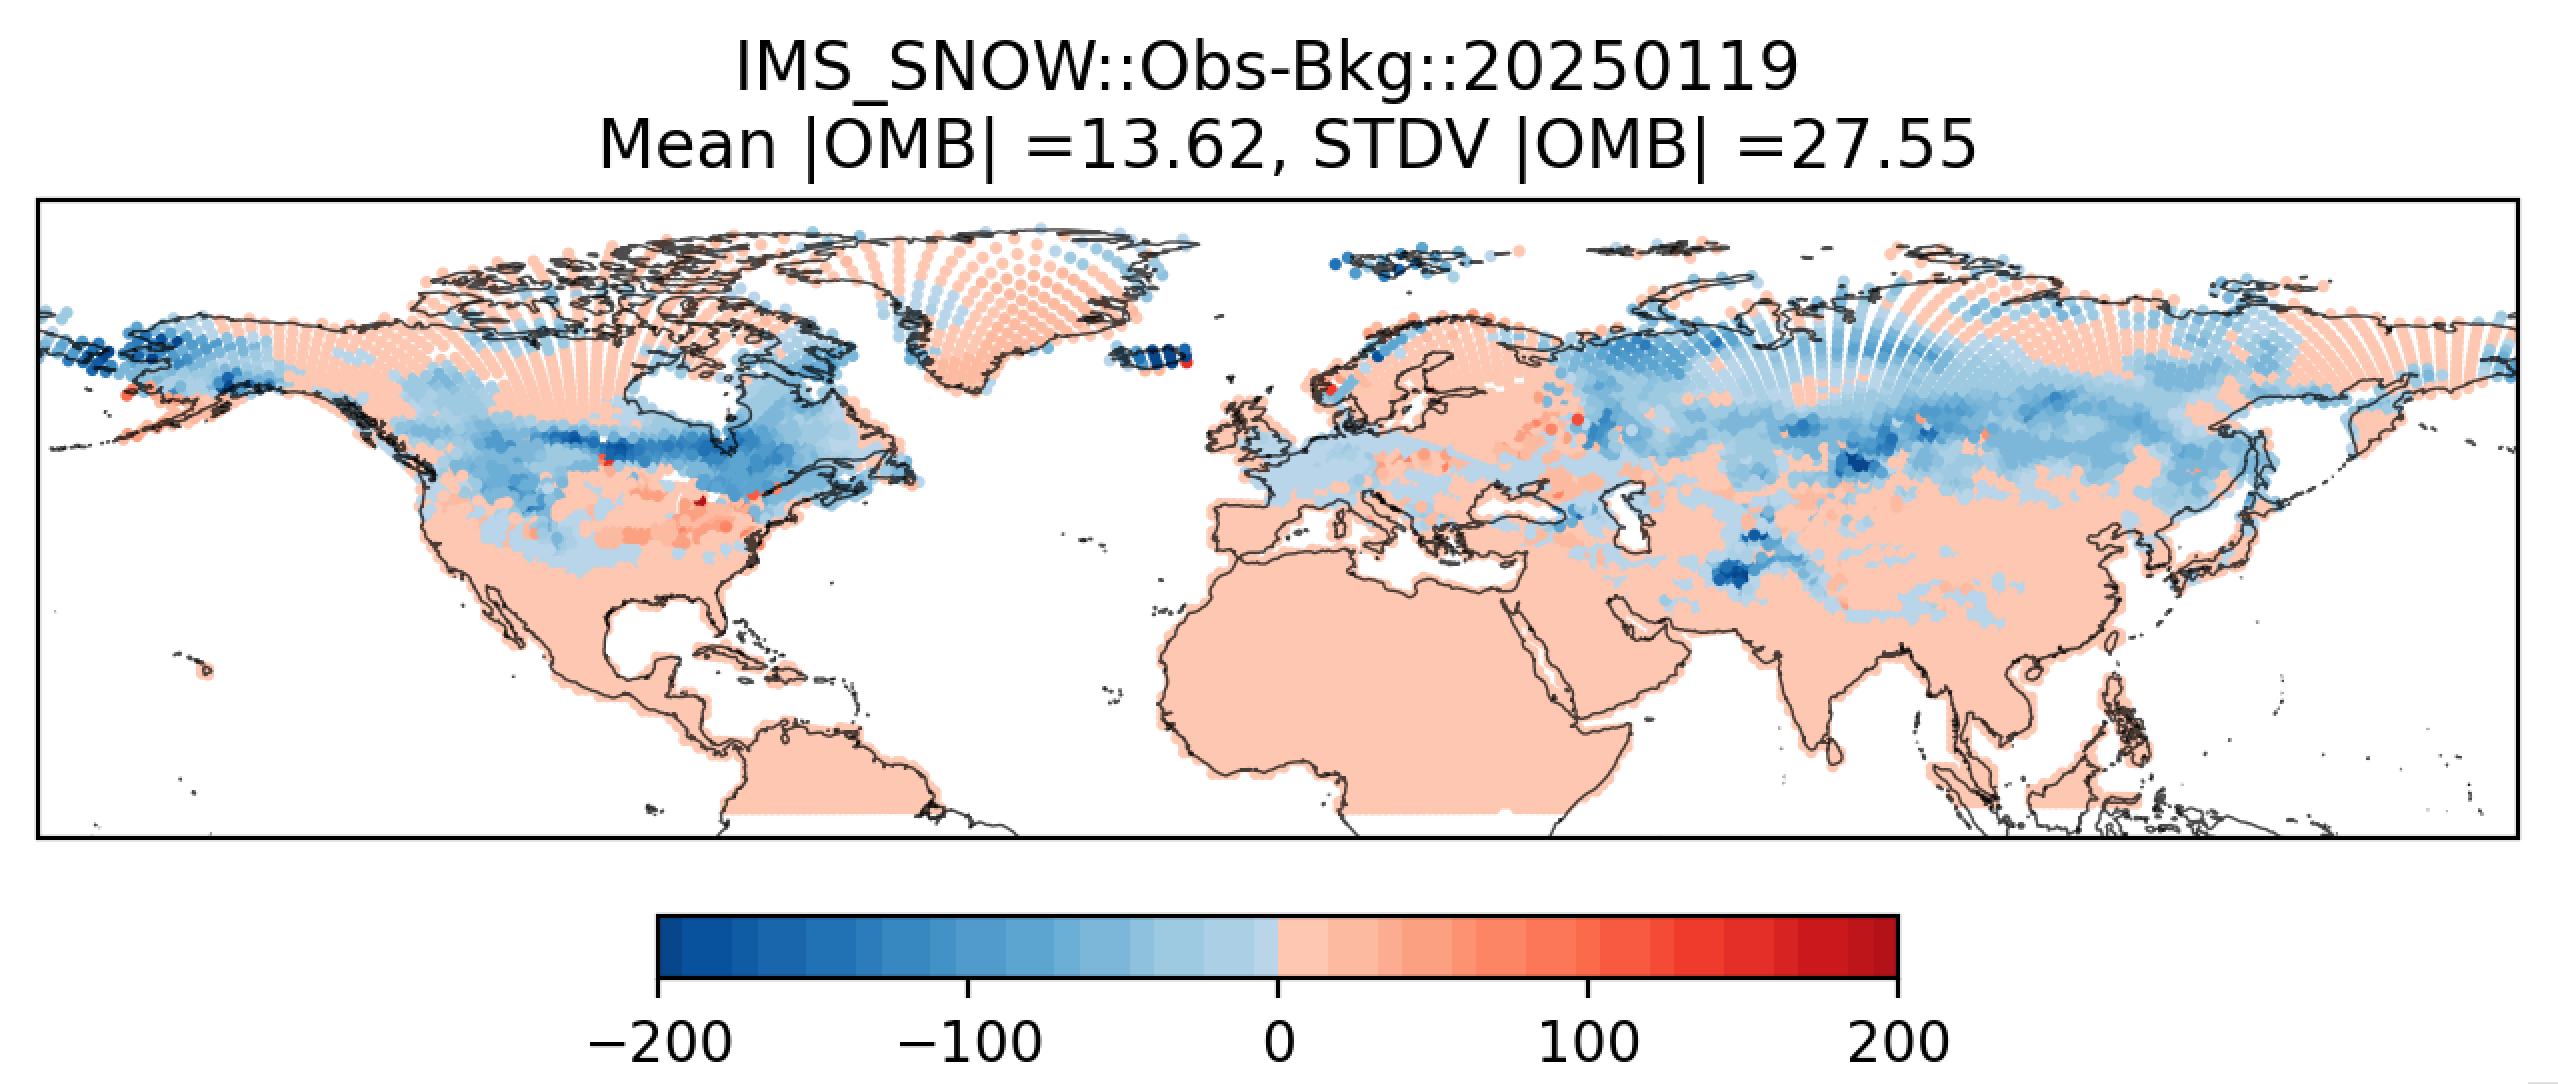
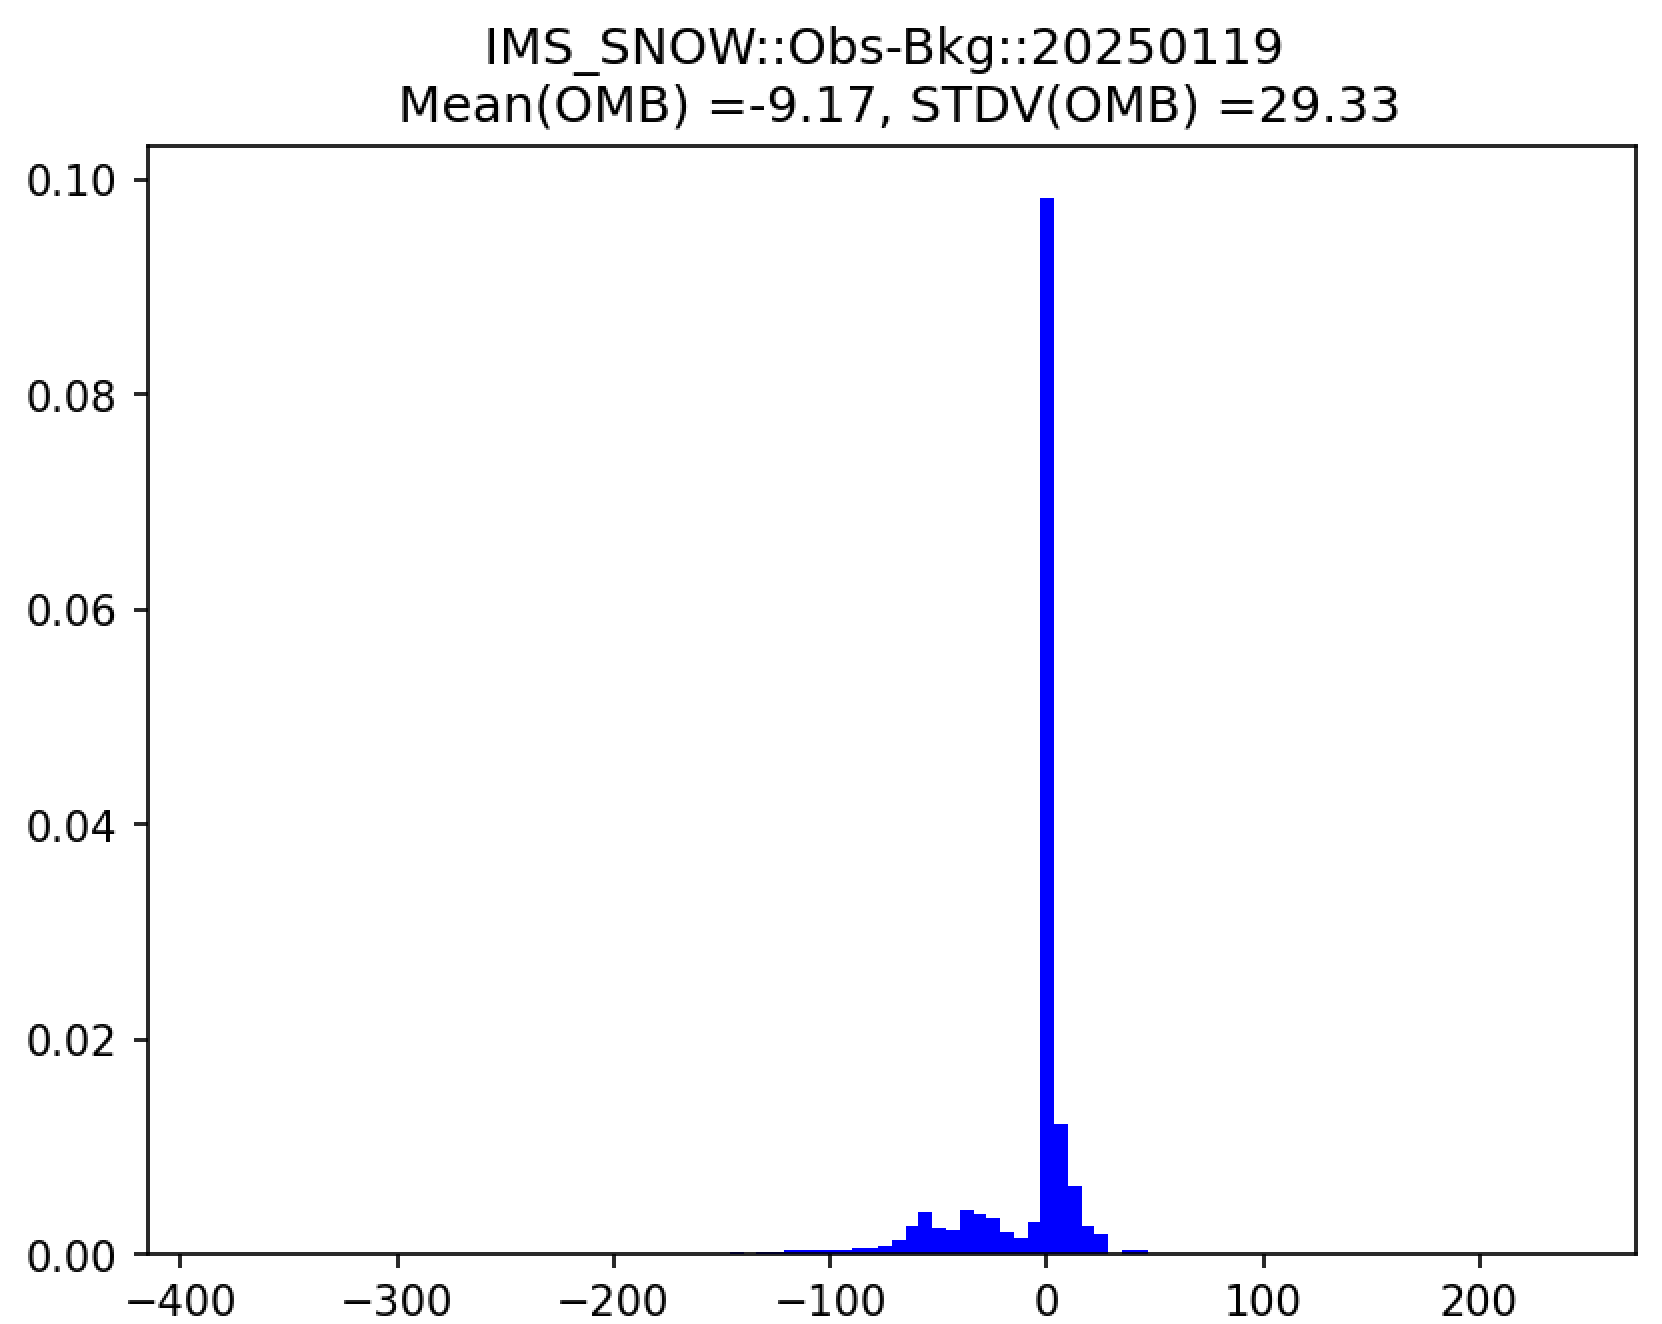
Additionally, in the plot subdirectory, users will find images depicting the results of the analysis task for each cycle as a scatter plot (hofx_oma_YYYYMMDD_scatter.png) and as a histogram (hofx_oma_YYYYMMDD_histogram.png).
The scatter plot is named OBS-BKG (i.e., Observation Minus Background [OMB]), and it depicts a map of snow depth results. Blue points indicate locations where the observed values are less than the background values, and red points indicate locations where the observed values are greater than the background values. The title lists the mean and standard deviation of the absolute value of the OMB values.
The histogram plots OMB values on the x-axis and frequency density values on the y-axis. The title of the histogram lists the mean and standard deviation of the real value of the OMB values.
|
|
2.2.6.5.1.1. Downloading the Plots
Note
There are many options for viewing plots, and instructions for this are highly machine dependent. Users should view the data transfer documentation for their system to secure copy files from a remote system (such as RDHPCS) to their local system. The instructions provided here apply to the Land DA training platform and may not be relevant on other platforms.
Open a new terminal window.
Type
bashto ensure a bash shell.Add your private key (e.g.,
ssh-add ~/.ssh/id_ed25519_student1).For each directory of plots, run:
rsync -v --rsh "ssh student#@137.75.93.46 ssh" ubuntu@controller:/home/ubuntu/exp_case/cadre1_lnd_era5_ims/com_dir/landda.202501##/plot/* plots/202501##In the command, replace:
student#with your actual student number,landda.202501##with the cycle date, andplots/202501##/with the correct cycle date.
This will create a plots directory and cycle subdirectory in your current working directory and download the plots.
2.2.7. Appendix
2.2.7.1. Building the Executables
The executables come pre-built in the Land DA Container. However, users who are curious about building the executables using the app_build.sh script can follow the instructions here.
Shell into the container.
singularity shell -B /home:/home /home/ubuntu/ubuntu22.04-intel-landda-cadre25.imgGo to the
land-DA_workflowdirectory in the container.cd /home/ubuntu/land-DA_workflow/sorcSet up the environment by sourcing the container’s spack-stack installation and loading the container modulefiles.
source /opt/spack-stack/spack-stack-1.6.0/envs/fms-2024.01/.bashenv-fms
module use ../modulefiles
module load build_singularity_intel
Build the model using
app_build.sh. Users must select either the ATML configuration (-a=ATML) or the LND configuration when building. Users indicate that the platform (-p) is a container using the-p=singularityargument. Conda was pre-built in previous steps, so users should include the--conda=offargument to avoid rebuilding it. The--buildoption keeps the executables in thebuilddirectory underbin.# Build ATML configuration (Noah-MP + FV3) ./app_build.sh -p=singularity -a=ATML --conda=off --build # Build LND configuration (Noah-MP + DATM) ./app_build.sh -p=singularity --conda=off --build
Note
The parm/run_container_executable.sh script looks for the executables built by the app_build.sh script. If users decide not to use this script to build the ATML exectuables, then the run_container_executable.sh script will need to point to the location of the prebuilt executables:
Pre-built LND executable:
/opt/land-DA_workflow/install/binPre-built ATML executable:
/opt/land-DA_workflow/sorc/build-atml/bin/.
After building the executables, type exit and continue to Section 2.2.5: Configure the Experiment.